CAN YOU BELIEVE A SOFTWARE BUSINESS GUY FIXED A TV (HARDWARE) FOR $10.
Annoying Problems Started 3 Months Ago…
My wife and I have gotten in the habit of watching the News in the evening from our Bedroom 46” LCD TV. However, 3 months ago, we noticed that when we turned the TV on, it would start cycling a few times before the screen lit up. The cycle itself was a little annoying as well, especially with the audio sound that would occur on each cycle. You know that sound, doo doo dle do doo dledo ¯¯¯ ¯¯ ¯¯¯
What started as a 10 second cycle to light up the screen started getting longer each day. Finally, after leaving the TV on and cycling for a hour, the lighting (backlit LCD TV) never came on.
So, What Was Wrong Inspector Clouseau?
I have seen this before in computer monitors. And, I forgot to mention that I would hear a loud click at the start of each cycle. For you techies out there, the TV is digital and has very few moving parts… so what could be clicking?
After a lot of research on the Brand (Samsung), the model number, and symptoms, VOILA! The disease was found. It was the capacitor of course. And, apparently, this was a known problem where if this was 2013, Samsung would have repaired this for free.
But now, what the h$#%k is a capacitor?
Ok.. Its the Capacitor, What Do I Do Now?
So I scrambled through the YouTuberverse and identified the model and unit numbers of my TV to discover the details, manuals, diagrams, and potential parts that could be the source of the problem.
Somehow, I figured out that when the TV starts, it needs a “Kick” of power to get the juices flowing (a technical term). I reasoned that the “Click” i was hearing was at the root cause of the lack of the power kick needed. I also inferred the capacitor was the cause as I dealt with an alternator and starter problem before in my cars and when the HVAC guy explained why my outdoor compressor fan wasn’t starting. It all makes sense, right?
Ready People? Charge! Well, Unplug It First…
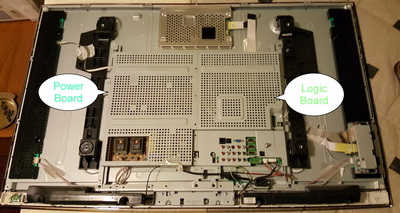
So, I searched for the right parts for the TV model I own and found it would be a direct replacement of a couple of capacitors (pictures to follow below) or the power board in the TV. There are two major boards in the back of a LCD TV. One is for the Power, the other is for the logic, controls, video conversions and scaling and I just ran out of the buzzwords so I will stop there.
I felt certain that it was the capacitors. Now to confirm the actual part type and specs, I had to open the back of the TV and take a look.
Hardware Is the New Software… And Software Is the New Hardware…
As most of you know, I have been talking and working with companies which are dealing with the convergence of hardware and software (and Digital with the Physical). But, like most of you, I am a software guy who knows a lot about PC’s, but not much about electronics or circuit boards or power supplies and boards, etc.
Enter from Screen Left –> Maker Dude
The Maker Movement has gotten under my skin in the last few years. So, enter the Super Hero, David, “The Maker Dude” to the Rescue. I told my wife Lynn, “I will save this TV Lynn (Nell).”
Sustainability is in my brain as well and who wants another 46″ TV going to the junkyard. No more leaching of mercury into the soil on some remote Island where the TV will get recycled by under age child labor. I will avoid that and fix this TV myself!
Open Sesame. Says Me. Remove The Board Without Hitting Anything.
Got my trusty power screwdriver and began to unscrew the back (plastic shell) of the TV. It came off easily. (BTW, UNPLUG the TV From the wall).
I then had to remove the steel covers (with lots of holes for air) that protected the two big boards. Then, like I used to do when I was fixing Personal Computers, I had to unplug the various ribbon cables that went from accessories like speakers and buttons to the boards.
Then I unscrewed the board from the TV’s metal chassis and laid it down on a soldering pad I borrowed from my son. I then started playing a new game, find the capacitors. With my tablet nearby, I had a reference picture of another board from a similar TV that I could use to identify where the capacitors were on the board.
BTW, is this reading like an “Action-Thriller” yet?
 And, amazingly, I found the capacitors and inspected them. The tops of capacitors are supposed to be flat, metal. However, you know when a capacitor is bad when it looks like an erupted volcano instead of flat metal surface on the top. Sure enough, there were four (4) of the six capacitors, barely 1/4 the size of a pig in a blanket, (I know, weird symbolism, but I love them), that were damaged.
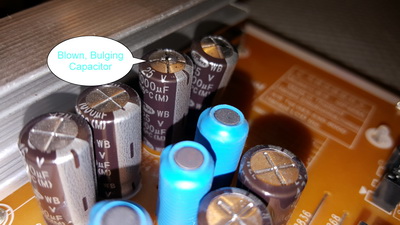 I took more pictures, read the lettering on them, and determined that they were 1000mF, 25Volt, and 150C degree capacitors. Not sure what any of that means, except the voltage and maybe the 150C means a hot application.
Do I Buy Online or Go to The Store?
Now I know what I need. So, do I get them on Amazon because that is where I buy everything? Or, do I go to the local electronics store.
I chose to go to the STORE for instant gratification and that I couldn’t wait for prime two-day or overnight delivery. But, believe or not, itreally hit my budget for going to the store.
Instead of spending $6 for 4 capacitors, I was going to buy them from the store and I knew I would spend a lot more money. I shelled out over $10. Can you believe it? Highway Robbery.
Ok. It’s Time to Fix It.
So, I come back to my home and pull out all the good Maker Tools I bought for my Son. Out comes the Soldering Gun, Solder Cleaner, Solder Sucker, Picking tools, Solder Wick, Magnifying glasses, and more.
Step one. Remove the damaged capacitors. heat the soldered connections up, press down on the solder sucker and when the solder is in liquid form, press the button and suck it up.
Step two. Do One again because I have never done this before.
Step Three. Repeat step two more frequently if you are inexperienced. Or like the women and men on YouTube, suck it up once per connection.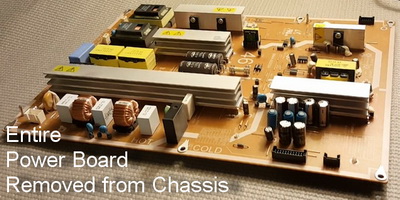
Step Four. Place the new capacitors in the top of the holes, be sure to find negative and positive facing polarities, otherwise the results look like a small Manhattan project.
Step Five. Turn the board over. Solder the wire pins to the board holes and ensure that it doesn’t wiggle and they are in tight.
Step Six. You are done on the Board.
Speedy Step Seven. Replace the boards in the TV chassis and return all parts, connectors, screws, and place and put back cover back on.
Houston. We Have Lift Off. (And Another Pats Super Bowl Victory).
I then plugged the TV back in, and Amaaaazing! The Power came right on! One cycle, and the screen lit up with the right menu. I did it!
I then mounted the TV back on the Wall Mount and I was up and running again!
SUCCESS….
In Summary and A Little In Retrospect.
Who would have thunk? A Software Guy… able to repair Hardware parts in a TV, and it only cost me $10.
My family is still just going wild and crazy-proud of me for doing this. (Or was it really because of another Patriots win this weekend)?
The “maker movement”, Make Magazine, My Son, and the resurgence of manufacturing in the US have all inspired me to do this. MakerFaire has been amazing in demonstrating the possible from what looks like the possible. Getting our hands into a project, and not just a keyboard, really was satisfying and meaningful.
On another note, I wish my dad was still alive. He was a electrical engineer who would have completed this project in under an hour. It took me three, excluding the road trip to the Electronics store. If my Dad was here, I know he would have been truly proud of me this weekend.
“Make-On” Dudes and Dudettes!
P.S. I am still not sure what to do with the extra parts I have leftover that I couldn’t find any place to return in the back of the TV.
 David is currently the CEO & Founder of TechX Foundry. He is a Technology Industry Investor, Advisor, Strategist, Operating Exec, and Growth Hacker.